

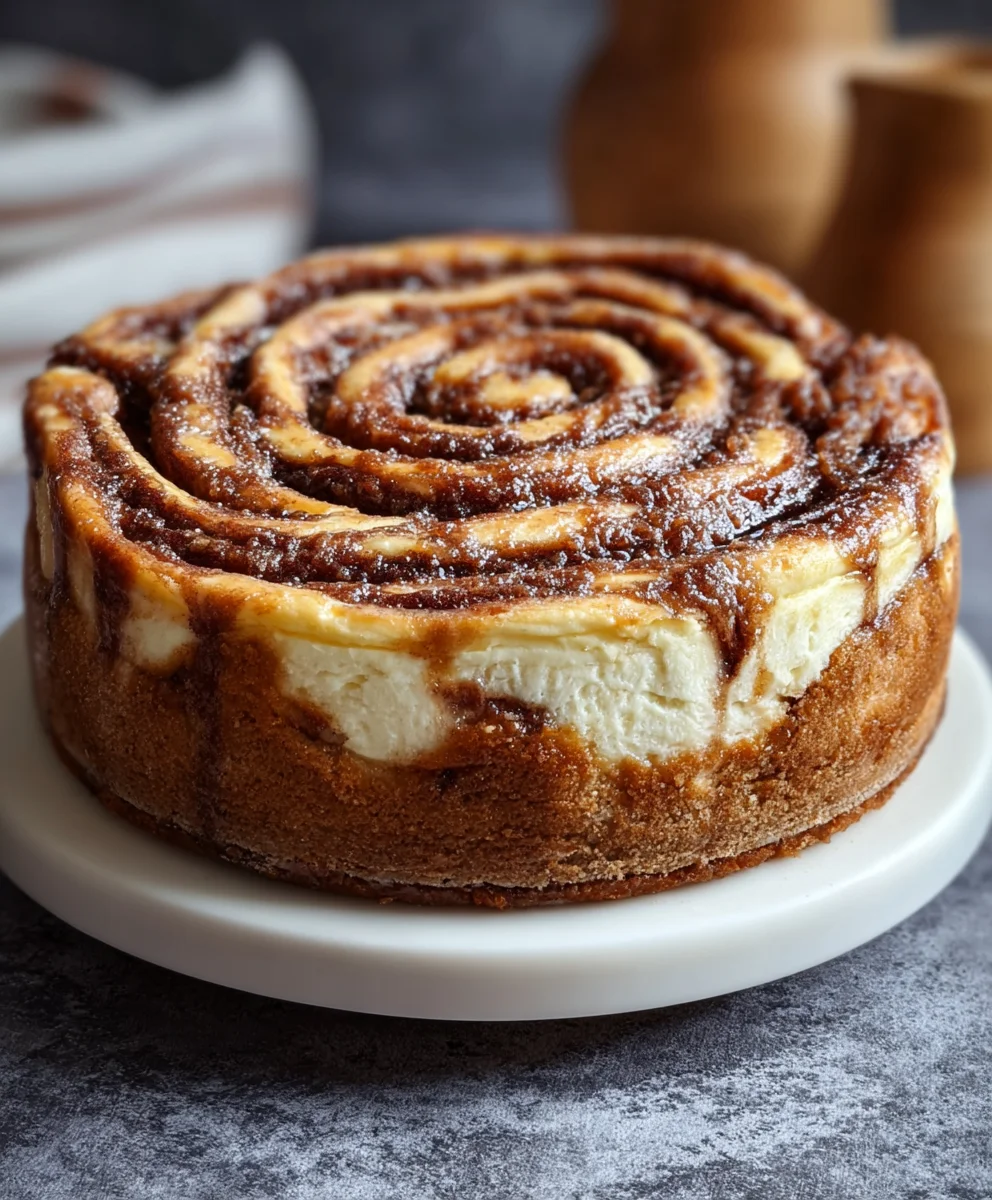
Cinnamon Roll Honeybun Cheesecake – prepare yourselves, my dear dessert enthusiasts, for an extraordinary culinary journey that I am absolutely delighted to share with you. This recipe promises to redefine your understanding of indulgence. Imagine the comforting warmth of a freshly baked cinnamon roll, the sticky-sweet glaze of a classic honeybun, and the luscious creaminess of a perfectly set cheesecake, all masterfully combined into one show-stopping creation. This isn’t just a dessert; it’s a symphony of nostalgic flavors and textures, meticulously orchestrated to deliver an unparalleled experience with every single bite.
While each component of this magnificent dessert boasts its own rich history—from the Swedish origins of the beloved cinnamon bun to the ancient Greek roots of cheesecake and the distinctly American appeal of the honeybun—our Cinnamon Roll Honeybun Cheesecake celebrates the modern art of culinary fusion. People adore this dish because it eliminates the delightful dilemma of choosing just one sweet treat. It’s the ultimate convergence of breakfast pastry bliss and sophisticated dessert elegance, offering that irresistible swirl of cinnamon, the tender crumb, the gooey sweetness, and the velvety smooth filling that makes it utterly unforgettable. Get ready to bake a masterpiece that will surely become a new household favorite!
Ingredients:
-
For the Cinnamon Roll Crust:
- 2 (12-ounce) packages refrigerated cinnamon rolls with cream cheese icing (ensure they are the larger, classic size). We’ll be reserving the icing, so don’t toss it!
- 4 tablespoons unsalted butter, melted.
-
For the Cinnamon Roll Honeybun Cheesecake Filling:
- 3 (8-ounce) packages full-fat cream cheese, softened completely to room temperature. This is absolutely critical for a smooth, lump-free cheesecake.
- 1 cup granulated sugar.
- 1/4 cup all-purpose flour. This little addition helps prevent cracks and gives the cheesecake a wonderful, sturdy texture.
- 1 teaspoon pure vanilla extract.
- 1/2 teaspoon ground cinnamon.
- 1/4 teaspoon ground nutmeg.
- Pinch of ground cloves (optional, but it deepens that “baked good” flavor beautifully).
- 3 large eggs, at room temperature. Just like the cream cheese, room temperature eggs emulsify better into the batter.
- 1/2 cup full-fat sour cream, at room temperature. This adds a lovely tang and extra creaminess to our Cinnamon Roll Honeybun Cheesecake.
-
For the Internal Cinnamon Swirl:
- 1/4 cup packed light brown sugar.
- 1 tablespoon ground cinnamon.
- 1 tablespoon unsalted butter, melted.
-
For the Honey Glaze:
- 1/2 cup powdered sugar (confectioners’ sugar), sifted to avoid lumps.
- 2 tablespoons honey, the star of our “honeybun” component.
- 1-2 tablespoons milk (or heavy cream), adjust for desired consistency.
- 1/4 teaspoon pure vanilla extract.
-
For the Cream Cheese Frosting Topping:
- All reserved cream cheese icing from the cinnamon roll packages. This is a brilliant shortcut and ensures cohesive flavor!
- Optional: 1-2 tablespoons milk or heavy cream, if you need to thin the frosting slightly for drizzling or spreading.
Preparing the Cinnamon Roll Crust:
-
Preheat and Prepare Your Pan: First things first, let’s get our oven ready. Preheat your oven to 350°F (175°C). Then, prepare a 9-inch springform pan. I always like to lightly grease the bottom and sides, then line the bottom with a circle of parchment paper. For cheesecakes, I also recommend wrapping the outside of the springform pan tightly with several layers of heavy-duty aluminum foil. This is crucial if you plan to use a water bath, which I highly recommend for preventing cracks and ensuring an incredibly moist Cinnamon Roll Honeybun Cheesecake.
-
Deconstruct the Cinnamon Rolls: This is where the magic begins for our unique crust! Carefully unroll the cinnamon rolls from both packages. Make sure to scrape all of that delicious cream cheese icing into a small bowl and set it aside – we’ll be using it for our luscious topping later. Once unrolled, take each cinnamon roll and cut it into small, bite-sized pieces. Think about creating little dough nuggets rather than perfect squares. This makes them easier to work with and ensures a more uniform crust texture.
-
Form the Crust: In a medium-sized bowl, combine the cut cinnamon roll pieces with the 4 tablespoons of melted unsalted butter. Toss them gently with a spatula or your hands until all the cinnamon roll pieces are coated. Transfer this mixture to your prepared springform pan. Using the bottom of a flat-bottomed glass or your fingers, firmly press the mixture evenly across the bottom of the pan and slightly up the sides (about 1 to 1.5 inches). You want a compact, sturdy base for our cheesecake. This pressing motion helps the butter bind the cinnamon roll pieces together, creating a delicious and unique crust.
-
Pre-bake the Crust: Place the springform pan with the pressed crust into your preheated oven. Bake for 8-10 minutes, or until the crust is lightly golden brown and smells wonderfully fragrant. Pre-baking helps to set the crust, preventing it from becoming soggy once the filling is added. Once baked, remove the pan from the oven and set it aside to cool completely on a wire rack while we prepare the cheesecake filling. This cooling step is important to prevent the hot crust from melting the cheesecake filling when they meet.
Crafting the Cinnamon Roll Honeybun Cheesecake Filling:
-
Cream the Cream Cheese: In a large mixing bowl, using an electric mixer (either a stand mixer with the paddle attachment or a handheld mixer), beat the softened cream cheese on medium speed until it is incredibly smooth and creamy, with absolutely no lumps. This usually takes about 3-5 minutes. The key here is starting with perfectly room temperature cream cheese; if it’s too cold, your filling will be lumpy, no matter how much you beat it. This step lays the foundation for a silky-smooth Cinnamon Roll Honeybun Cheesecake.
-
Incorporate Dry Ingredients: Gradually add the granulated sugar to the cream cheese mixture, beating on low speed until just combined. Then, add the all-purpose flour, ground cinnamon, ground nutmeg, and the optional pinch of ground cloves. Continue mixing on low speed, scraping down the sides of the bowl as needed, until the dry ingredients are fully incorporated and the mixture is smooth again. The flour helps to stabilize the cheesecake and prevent cracking, while the spices infuse that delightful cinnamon roll flavor throughout the filling.
-
Add Eggs Gently: Now, add the eggs one at a time, beating on very low speed just until each egg is incorporated before adding the next. It’s crucial not to overmix at this stage! Overmixing introduces too much air into the batter, which can cause the cheesecake to puff up too much during baking and then collapse and crack as it cools. We want a dense, creamy texture, not an airy one.
-
Fold in Sour Cream and Vanilla: Finally, gently fold in the room temperature sour cream and pure vanilla extract using a spatula. Mix until just combined. Again, avoid vigorous mixing. The sour cream adds a beautiful richness, a slight tang that balances the sweetness, and contributes to the cheesecake’s signature smooth, velvety texture. Our luscious filling for the Cinnamon Roll Honeybun Cheesecake is now ready!
Preparing the Internal Cinnamon Swirl:
-
Combine Swirl Ingredients: In a small bowl, whisk together the packed light brown sugar, 1 tablespoon of ground cinnamon, and the 1 tablespoon of melted unsalted butter until well combined and a thick, paste-like consistency is formed. This mixture is what will create those beautiful, aromatic swirls within our cheesecake, truly bringing home the “cinnamon roll” aspect of this decadent dessert.
Assembling and Baking Your Cinnamon Roll Honeybun Cheesecake:
-
Layer the Filling and Swirl: Pour half of the prepared cheesecake filling over the cooled cinnamon roll crust in the springform pan. Drizzle about half of the cinnamon swirl mixture over the cheesecake filling. Using a butter knife or a skewer, gently swirl the cinnamon mixture into the cheesecake filling. Be careful not to drag the knife all the way to the crust; we want distinct layers and swirls. Repeat this process with the remaining cheesecake filling and cinnamon swirl mixture, creating another beautiful layer. This layering ensures you get that delightful cinnamon burst in every single bite of your Cinnamon Roll Honeybun Cheesecake.
-
Prepare the Water Bath: This step is essential for a crack-free and perfectly cooked cheesecake. Place your foil-wrapped springform pan inside a larger roasting pan. Carefully pour hot water into the larger roasting pan until it comes about halfway up the sides of the springform pan. The water bath creates a moist, even heat environment, which prevents the edges of the cheesecake from cooking faster than the center and helps maintain a smooth, creamy texture. It’s a little extra effort, but it makes all the difference.
-
Bake the Cheesecake: Carefully transfer the roasting pan with the cheesecake to your preheated 350°F (175°C) oven. Bake for 15 minutes at 350°F (175°C), then reduce the oven temperature to 325°F (160°C) without opening the oven door. Continue baking for another 50-60 minutes, or until the edges of the cheesecake are set, but the center (about 2-3 inches in diameter) still has a slight jiggle when you gently nudge the pan. An internal temperature of 150-155°F (65-68°C) in the center is usually perfect.
-
Slow Cooling is Key: Once baked, turn off the oven but leave the cheesecake inside with the oven door ajar for 1 hour. This slow cooling process is critical for preventing sudden temperature changes that can cause the cheesecake to crack. After an hour, carefully remove the roasting pan from the oven, then carefully lift the springform pan out of the water bath. Remove the foil from around the springform pan and place the cheesecake on a wire rack to cool completely to room temperature. This will take several hours. Patience is a virtue when making cheesecake!
-
Chill Thoroughly: Once cooled to room temperature, cover the cheesecake loosely with plastic wrap and refrigerate for at least 6-8 hours, or ideally, overnight. This chilling period is non-negotiable! It allows the cheesecake to fully set, develop its rich flavor, and achieve that firm, yet creamy texture that makes a truly outstanding Cinnamon Roll Honeybun Cheesecake. Resist the urge to cut into it early!
Whipping Up the Honey Glaze and Cream Cheese Frosting:
-
Prepare the Honey Glaze: In a small bowl, whisk together the sifted powdered sugar, honey, and 1 tablespoon of milk (or heavy cream) and vanilla extract until a smooth, pourable glaze forms. If the glaze is too thick, add more milk, a tiny bit at a time, until you reach your desired drizzling consistency. We want it to be thick enough to cling to the cheesecake but thin enough to flow beautifully. This honey glaze is what really brings in the “honeybun” aspect and adds a beautiful sheen and extra layer of sweetness.
-
Prepare the Cream Cheese Frosting Topping: Retrieve the reserved cream cheese icing from the cinnamon roll packages. If it’s too stiff for drizzling or spreading, you can add 1-2 tablespoons of milk or heavy cream, whisking it in until it reaches a smooth, spreadable, or pipeable consistency. This shortcut is fantastic because it perfectly complements the cinnamon roll crust, tying all the flavors together in this magnificent Cinnamon Roll Honeybun Cheesecake.
The Grand Finale: Decorating and Serving Your Cinnamon Roll Honeybun Cheesecake:
-
Unmold the Cheesecake: Once your cheesecake has been thoroughly chilled, carefully run a thin knife around the edge of the springform pan before releasing the clasp and removing the ring. Then, slide the cheesecake onto a serving platter by gently separating it from the parchment-lined bottom. If you chilled it well, this step should be quite easy.
-
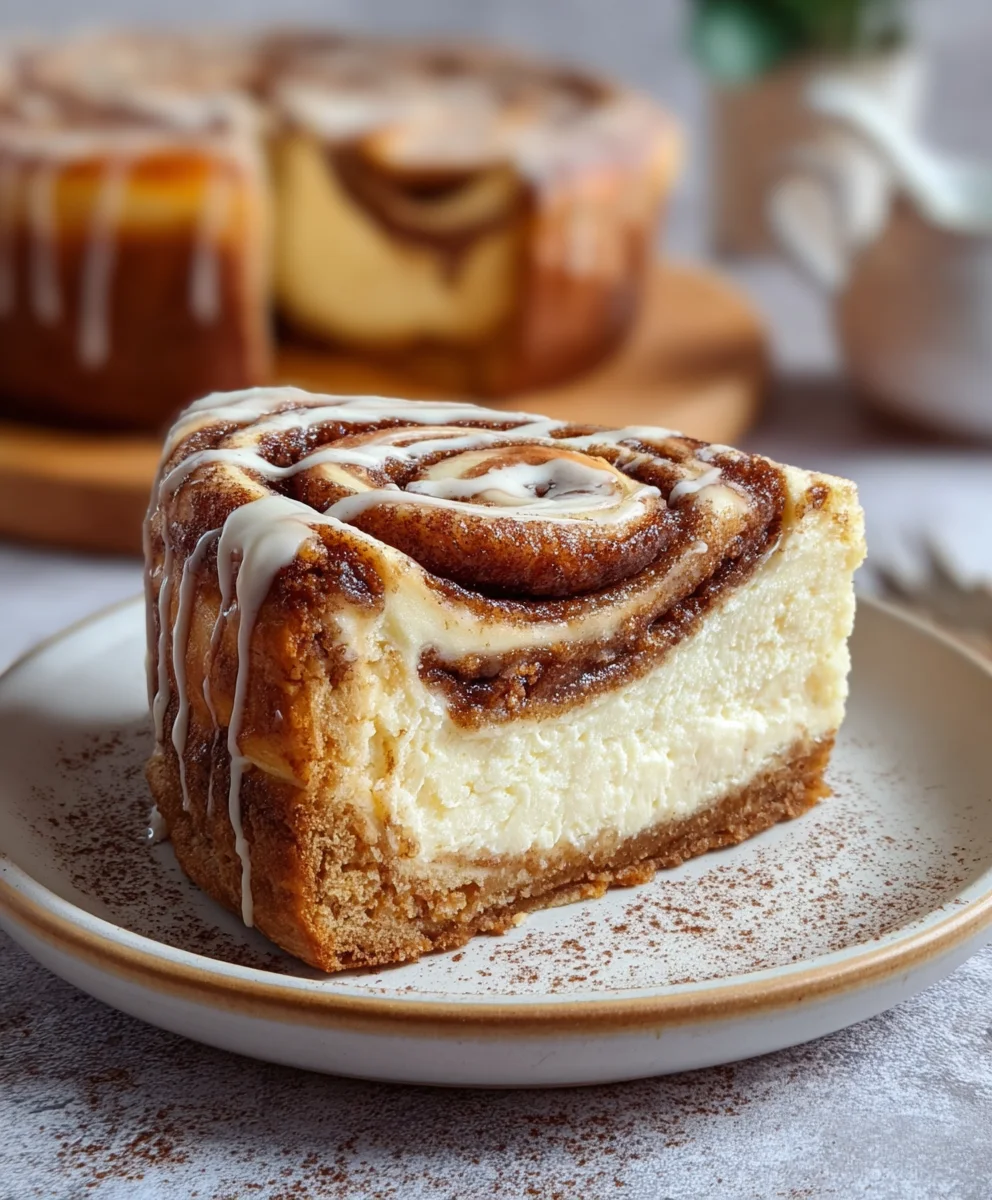
Glaze and Frost: Generously drizzle the honey glaze all over the top of the chilled Cinnamon Roll Honeybun Cheesecake. You can do this in an artistic pattern or simply cover the whole top. Then, using a spoon, spatula, or a piping bag fitted with a round tip, pipe or spread the prepared cream cheese frosting on top of the cheesecake. You can create a classic crisscross pattern, a rustic swirl, or any design that pleases your eye. I love creating a distinct pattern so that every slice gets a little bit of that sweet, tangy frosting.
-
Optional Garnishes: For an extra touch of elegance and flavor, you can sprinkle a little extra ground cinnamon, finely chopped pecans, or even some candied walnuts over the top. These small additions enhance the visual appeal and add another layer of texture to each bite.
-
Slice and Serve: Use a sharp knife dipped in hot water and wiped clean between each cut to ensure clean, beautiful slices. Serve immediately and watch your guests swoon over this incredibly indulgent and flavorful Cinnamon Roll Honeybun Cheesecake! It’s truly a showstopper.
-
Storage: Leftover cheesecake can be stored, covered, in the refrigerator for up to 3-4 days. While it’s unlikely to last that long, it’s good to know it keeps well!
Conclusion:
And there you have it, my friends – a journey through the creation of what I truly believe is one of the most magnificent desserts you will ever have the pleasure of tasting, let alone making. This isn’t just a recipe; it’s an invitation to experience pure culinary bliss, a symphony of flavors and textures that dance on your palate with every single forkful. I’m talking about the kind of dessert that stops conversations, elicits gasps of delight, and leaves a lasting impression long after the last crumb is gone. This Cinnamon Roll Honeybun Cheesecake is a true masterpiece, effortlessly combining the comforting, spiced warmth of a classic cinnamon roll with the sticky, glazed sweetness of a honeybun, all nestled on a creamy, dreamy cheesecake base.
Why is this a must-try recipe, you ask? Because it’s an innovative fusion that takes beloved comfort foods and elevates them to an extraordinary level. You get the irresistible gooeyness, the aromatic cinnamon swirl, and the decadent cream cheese frosting from the cinnamon roll. You get that distinctively sweet, slightly caramelized, and perfectly glazed exterior that makes a honeybun so addictive. And then, underpinning it all, is the rich, smooth, and tangy creaminess of a perfectly baked cheesecake. It’s a triple threat of deliciousness, designed to impress and satisfy even the most discerning dessert connoisseur. Forget choosing between your favorite bakery treats; with this recipe, you get to have them all, beautifully integrated into one show-stopping creation. It looks incredibly impressive, yet with my step-by-step guidance, it’s surprisingly approachable for home bakers of all skill levels. The effort you put in will be repaid tenfold in the sheer joy and satisfaction it brings to you and your loved ones.
Now, let’s talk about how to truly make this dessert shine. While it’s absolutely perfect on its own, I love to offer a few serving suggestions and variations to elevate your experience even further. For serving, I highly recommend allowing your cheesecake to come to just slightly below room temperature for about 15-20 minutes before slicing. This allows the creamy texture to soften perfectly, enhancing the overall melt-in-your-mouth experience. A delicate dusting of powdered sugar just before serving adds an elegant touch, or for an extra layer of decadence, a dollop of freshly whipped cream or a small scoop of vanilla bean ice cream would be simply divine. A light drizzle of warm caramel sauce or a touch of extra honey glaze wouldn’t go amiss either, especially if you have an extra sweet tooth like mine!
Feeling creative? Here are a few variations you might consider. If you’re a nut lover, consider sprinkling some toasted pecans or walnuts over the top before the final chilling for an added crunch and nutty flavor profile. For a different crust, try using crushed Biscoff cookies or even shortbread biscuits instead of graham crackers to add a distinct, buttery depth. In the cheesecake filling itself, you could swirl in a touch of maple extract to enhance the honeybun notes, or for a seasonal twist, a very thin layer of spiced apple or pear compote could be added over the crust before the cheesecake batter goes in. Individual portions are also a fantastic idea for parties; simply bake the cheesecake in lined muffin tins for mini versions, adjusting baking time accordingly. Imagine presenting these miniature masterpieces at your next gathering!
So, what are you waiting for? I wholeheartedly encourage you to roll up your sleeves, gather your ingredients, and embark on this incredibly rewarding baking adventure. Don’t be intimidated by the layers; each one builds upon the last to create a harmonious symphony of flavors that truly must be tasted to be believed. This Cinnamon Roll Honeybun Cheesecake is more than just a dessert; it’s a celebration of indulgent flavors and the joy of home baking. Once you’ve created your own glorious cheesecake, I would absolutely love to hear about it! Please, don’t hesitate to share your experience with me. What variations did you try? What did your family and friends think? Snap a photo and share it online, tagging me so I can revel in your delicious success. Happy baking, and get ready for a dessert experience that will leave everyone craving more!
Frequently Asked Questions (FAQs)
How do I prevent my cheesecake from cracking?
To minimize cracks, avoid overbaking. The center should still have a slight jiggle when you turn off the oven. Crucially, allow the cheesecake to cool slowly. I recommend turning off the oven, propping the door open slightly, and letting the cheesecake cool inside the oven for at least an hour before transferring it to a wire rack. Sudden temperature changes are a common cause of cracks.
Can I make Cinnamon Roll Honeybun Cheesecake ahead of time?
Absolutely! This cheesecake is an excellent make-ahead dessert. In fact, its flavors often deepen and become even more harmonious after a day or two in the refrigerator. You can prepare the entire cheesecake up to 2-3 days in advance. Just be sure to cover it loosely with plastic wrap once it’s completely cooled to prevent it from drying out or absorbing refrigerator odors.
What’s the best way to store leftover cheesecake?
Leftover slices of your Cinnamon Roll Honeybun Cheesecake should be stored in an airtight container or covered tightly with plastic wrap in the refrigerator. It will typically stay fresh and delicious for 4-5 days. For the best taste and texture, allow slices to sit at room temperature for about 15-20 minutes before serving.
Can I freeze this cheesecake?
Yes, cheesecake freezes beautifully! For best results, ensure the cheesecake is completely cooled. You can freeze it whole or in individual slices. Wrap the cheesecake tightly first in plastic wrap, then in aluminum foil to prevent freezer burn. It can be stored in the freezer for up to 1-2 months. Thaw frozen cheesecake overnight in the refrigerator before serving.
Do I need a water bath for this cheesecake recipe?
While some cheesecake recipes greatly benefit from a water bath for even cooking and to prevent cracks, I’ve designed this specific Cinnamon Roll Honeybun Cheesecake recipe to achieve a perfect texture without one. As long as you follow the baking instructions, particularly the cooling process, you should achieve a beautifully smooth and crack-free cheesecake without the extra hassle of a water bath.
Cinnamon Roll Honeybun Cheesecake
An extraordinary culinary journey, combining the comforting warmth of a freshly baked cinnamon roll, the sticky-sweet glaze of a classic honeybun, and the luscious creaminess of a perfectly set cheesecake into one show-stopping creation.
Ingredients
-
1 ½ cups graham cracker crumbs
-
½ cup melted butter
-
16 oz (2 cups) cream cheese, softened
-
1 cup granulated sugar
-
¼ cup brown sugar
-
1 cup powdered sugar
Instructions
-
Step 1
Preheat oven to 350°F (175°C). Combine graham cracker crumbs and melted butter. Press firmly into the bottom of a 9-inch springform pan. Bake for 10 minutes, then cool completely on a wire rack. -
Step 2
In a large mixing bowl, beat softened cream cheese on medium speed until incredibly smooth and lump-free. Gradually add granulated sugar and brown sugar, beating on low speed until just combined. Scrape down the bowl sides as needed. -
Step 3
Pour the cheesecake filling evenly over the cooled crust. Place the springform pan inside a larger roasting pan and carefully pour hot water into the roasting pan until it comes halfway up the sides of the springform pan (water bath). Bake at 350°F (175°C) for 15 minutes, then reduce oven temperature to 325°F (160°C) and continue baking for another 50-60 minutes, or until the edges are set and the center (about 2-3 inches in diameter) still has a slight jiggle. -
Step 4
Turn off the oven but leave the cheesecake inside with the oven door ajar for 1 hour for slow cooling. After an hour, remove the cheesecake from the water bath and cool completely to room temperature on a wire rack (several hours). Once cooled, cover loosely and refrigerate for at least 6-8 hours, or ideally overnight, to set fully. -
Step 5
Once chilled, run a thin knife around the edge of the pan before removing the springform ring. In a small bowl, whisk powdered sugar with 1-2 tablespoons of milk (or water) until a smooth, pourable glaze forms. Drizzle generously over the top of the chilled cheesecake. Slice with a sharp knife dipped in hot water and wiped clean between cuts. Serve immediately. Store leftovers covered in the refrigerator for up to 3-4 days.
Important Information
Nutrition Facts (Per Serving)
It is important to consider this information as approximate and not to use it as definitive health advice.
Allergy Information
Please check ingredients for potential allergens and consult a health professional if in doubt.

Leave a Comment