

No Bake Peanut Butter Cup Pie – just the name alone evokes a sense of creamy, chocolatey bliss, doesn’t it? As an avid dessert enthusiast, I’ve found that few treats captivate hearts quite like the perfect harmony of rich peanut butter and decadent chocolate. Imagine sinking your fork into a silky-smooth, intensely flavored pie, where every bite is a luxurious blend of salty-sweet peanut butter and luscious chocolate, all without the need to ever turn on your oven. That’s the magic we’re about to create!
While this particular pie might not boast centuries of history, it beautifully encapsulates the enduring American love affair with peanut butter and chocolate, a pairing made famous by classic candies and beloved by generations. It’s a modern classic, born from a desire for indulgent flavors combined with effortless preparation. I believe the widespread adoration for this dish stems from its utterly irresistible taste profile – that perfect balance of sweet and savory – and its wonderfully contrasting textures, often featuring a crumbly, buttery crust against a melt-in-your-mouth filling.
Why This No Bake Peanut Butter Cup Pie is a Fan Favorite
It’s the ultimate dessert for any occasion: an impressive yet simple showstopper for summer gatherings, holiday celebrations, or even just a weeknight treat when you crave something truly special. The convenience of a No Bake Peanut Butter Cup Pie means less time in the kitchen and more time enjoying the delicious results with your loved ones. Get ready to discover your new go-to recipe for pure dessert perfection!
Ingredients:
- For the Graham Cracker Crust:
- 1 ½ cups (approximately 12-14 full sheets) graham cracker crumbs
(Tip: You can buy pre-crushed crumbs for convenience, or crush whole graham crackers yourself using a food processor for a finer, more uniform texture, or by placing them in a Ziploc bag and crushing with a rolling pin for a slightly coarser, more rustic feel. Aim for a consistency similar to fine sand.) - 6 tablespoons unsalted butter, melted
(Why unsalted? It gives you control over the saltiness of the pie. Melting it ensures it evenly coats the crumbs, acting as the perfect binding agent.) - ¼ cup granulated sugar
(This adds just the right touch of sweetness to balance the salty-sweetness of the peanut butter filling, and helps the crust crisp up slightly.)
- 1 ½ cups (approximately 12-14 full sheets) graham cracker crumbs
- For the No-Bake Peanut Butter Filling:
- 8 ounces (1 block) full-fat cream cheese, softened to room temperature
(Crucial tip: Ensure your cream cheese is truly soft. This is the secret to a lump-free, silky-smooth filling. Take it out of the fridge at least 1-2 hours before you plan to start.) - 1 ½ cups powdered sugar (confectioners’ sugar)
(Powdered sugar is key here because it dissolves instantly, preventing any grainy texture in your creamy filling.) - 1 cup (250g) creamy peanut butter
(Important: For the best texture and stability in a no-bake pie, I highly recommend using a conventional creamy peanut butter like Jif or Skippy. Natural peanut butter, with its tendency to separate oils, can result in a filling that’s too soft or oily.) - 1 teaspoon pure vanilla extract
(A little vanilla goes a long way in enhancing the overall flavor profile, adding depth to the rich peanut butter.) - 1 ½ cups heavy cream (heavy whipping cream), very cold
(The colder, the better! Cold cream whips up faster and holds its shape much more effectively, giving your pie that wonderfully light and airy consistency.)
- 8 ounces (1 block) full-fat cream cheese, softened to room temperature
- For the Mix-ins and Garnish:
- 1 cup miniature peanut butter cups, roughly chopped
(These little gems are folded directly into the filling, providing delightful pockets of chocolatey, peanut buttery goodness in every bite.) - 6-8 regular-sized peanut butter cups, roughly chopped
(Reserved for decorating the top of your finished pie, these add an irresistible visual appeal and an extra layer of indulgence.) - Optional: Chocolate syrup, for drizzling
(If you’re feeling extra decadent, a final drizzle of chocolate syrup can elevate your pie to gourmet status!)
- 1 cup miniature peanut butter cups, roughly chopped
Making the Graham Cracker Crust
-
Prepare Your Graham Cracker Crumbs and Combine Dry Ingredients:
If you’re not using pre-crushed crumbs, now is the time to prepare them. Place your graham crackers in a food processor and pulse until they form fine, even crumbs. Alternatively, place them in a sturdy freezer bag and crush them with a rolling pin until you achieve your desired consistency. Once your crumbs are ready, transfer them to a medium-sized mixing bowl. Add the ¼ cup of granulated sugar to the crumbs and mix thoroughly with a spoon or whisk until everything is well combined. This initial mixing ensures the sugar is evenly distributed throughout the crust, contributing to a consistently sweet base.
-
Incorporate the Melted Butter:
Melt the 6 tablespoons of unsalted butter. You can do this in a microwave-safe bowl in 20-second intervals, stirring in between, or gently on the stovetop. Once the butter is completely melted, pour it directly over the graham cracker and sugar mixture. Stir everything together very well using a fork or your hands until all the crumbs are moistened and resemble wet sand. It’s important that every crumb is coated, as this is what binds the crust together and prevents it from crumbling when you cut into your pie.
-
Press the Crust into Your Pie Plate:
Transfer the moistened graham cracker mixture into a standard 9-inch pie plate. Start by evenly distributing the crumbs across the bottom of the plate. Then, using the bottom of a flat-bottomed glass, a measuring cup, or even your clean fingers, firmly press the crumbs into an even layer across the bottom of the pie plate. Once the bottom is set, gently work the remaining crumbs up the sides of the pie plate, pressing firmly to create a neat, even edge. The key here is to press very, very firmly. The harder you press, the more solid and less crumbly your crust will be, ensuring perfect slices later on.
-
Chill the Crust for Firmness:
Once you’ve beautifully formed your crust, place the pie plate into the refrigerator to chill for at least 30 minutes. This step is essential! Chilling allows the butter to solidify and bind the crumbs together, creating a sturdy base that won’t fall apart when you add your delicious filling. It also helps the crust hold its shape perfectly.
Preparing the Rich Peanut Butter Filling
-
Cream the Softened Cream Cheese:
In a large mixing bowl, using an electric mixer (either a stand mixer with the paddle attachment or a handheld mixer), beat the 8 ounces of softened full-fat cream cheese on medium speed for about 2-3 minutes. Do not skip this step! It’s crucial to beat the cream cheese until it is incredibly smooth, light, and completely free of any lumps. This aeration process also helps create a wonderfully airy texture for your filling. Scrape down the sides of the bowl with a spatula periodically to ensure everything is incorporated.
-
Gradually Add the Powdered Sugar:
With the mixer on low speed, begin adding the 1 ½ cups of powdered sugar to the cream cheese, a little at a time. Start slowly to avoid a “sugar cloud” explosion in your kitchen! Once most of the sugar is incorporated, increase the mixer speed to medium-high and continue beating for another 2-3 minutes. The mixture should become even lighter, fluffier, and visibly pale. Again, scrape down the sides and bottom of the bowl frequently to ensure all the sugar is fully mixed in and there are no hidden pockets of unmixed ingredients.
-
Incorporate the Peanut Butter and Vanilla:
Reduce the mixer speed to low and add the 1 cup of creamy peanut butter and 1 teaspoon of vanilla extract to the cream cheese mixture. Once the peanut butter is mostly incorporated, increase the speed to medium and beat until the mixture is completely smooth, uniformly colored, and wonderfully creamy. This should take another 1-2 minutes. Be careful not to overmix at this stage; you just want everything thoroughly combined. The mixture should be thick, luscious, and absolutely irresistible – try not to eat it all straight from the bowl!
-
Gently Fold in the Miniature Peanut Butter Cups:
Using a rubber spatula, gently fold the 1 cup of roughly chopped miniature peanut butter cups into the peanut butter filling. The key word here is “gently.” You want to distribute the candy pieces evenly throughout the filling without deflating the air you’ve incorporated. This step adds wonderful texture and bursts of chocolate-peanut butter flavor in every spoonful.
Whipping the Cream for Ultimate Creaminess
-
Prepare Your Whipping Equipment (Optional, but Recommended):
For the absolute best results when whipping cream, I highly recommend chilling your mixing bowl (preferably a metal one) and your whisk attachment (if using a stand mixer) or beaters (if using a hand mixer) in the freezer for about 10-15 minutes before you start. This helps the cream whip faster and achieve a more stable, voluminous result. Cold equipment, cold cream – it’s a winning combination!
-
Pour in the Very Cold Heavy Cream:
Pour the 1 ½ cups of very cold heavy cream into your chilled mixing bowl. Remember, the colder the cream, the easier and better it will whip.
-
Whip the Cream to Stiff Peaks:
Using your electric mixer (with the chilled whisk attachment or beaters), start whipping the heavy cream on medium speed, gradually increasing to medium-high. You’ll notice a progression as the cream whips:
- Soft Peaks: The cream will thicken and hold a soft peak that barely holds its shape when the beater is lifted.
- Medium Peaks: The peaks will hold their shape better but will still curl slightly at the tip.
- Stiff Peaks: The cream will be thick, fluffy, and hold firm, defined peaks when the beater is lifted. The cream will be light and airy.
Your goal is stiff peaks. This typically takes anywhere from 3-6 minutes, depending on your mixer and the temperature of your cream. Be very careful not to over-whip! If you whip too long, the cream will become grainy and eventually turn into butter. Stop as soon as you reach firm, stiff peaks.
Assembling Your No Bake Peanut Butter Cup Pie
-
Gently Fold Whipped Cream into Peanut Butter Mixture:
Now for the magic moment of combining! Take about one-third of your freshly whipped cream and add it to the peanut butter mixture in the large mixing bowl. Using your rubber spatula, gently fold it in. This first addition lightens the peanut butter mixture, making it easier to incorporate the rest of the whipped cream without deflating it too much.
Once that’s mostly combined, add the remaining two-thirds of the whipped cream. Continue to fold gently, using an upward motion from the bottom of the bowl, turning the bowl as you go. The key here is patience and gentleness. You want to incorporate the whipped cream fully, creating a light, airy, and homogeneous filling, but you also want to preserve as much of that lovely whipped cream volume as possible. Stop folding as soon as no streaks of white cream are visible. The resulting filling should be incredibly light, fluffy, and smooth.
-
Fill the Chilled Crust:
Retrieve your graham cracker crust from the refrigerator. Carefully spoon or pour the entire peanut butter filling into the chilled crust. Use your rubber spatula to gently spread the filling evenly across the crust, creating a smooth and appealing top surface. You can even create a little swirl pattern on top for a rustic, homemade look.
Chilling for Perfection and Garnish
-
Chill the Pie Until Firm:
This is perhaps the hardest step – waiting! Place the assembled pie back into the refrigerator to chill for a minimum of 4-6 hours. However, for the absolute best results and a perfectly firm, sliceable pie, I highly recommend chilling it overnight (8 hours or more). Chilling allows the filling to set completely, ensuring each slice holds its shape beautifully and the flavors have ample time to meld and deepen. This waiting period is crucial for the structural integrity and the overall deliciousness of your No Bake Peanut Butter Cup Pie.
-
Garnish and Serve Your Masterpiece:
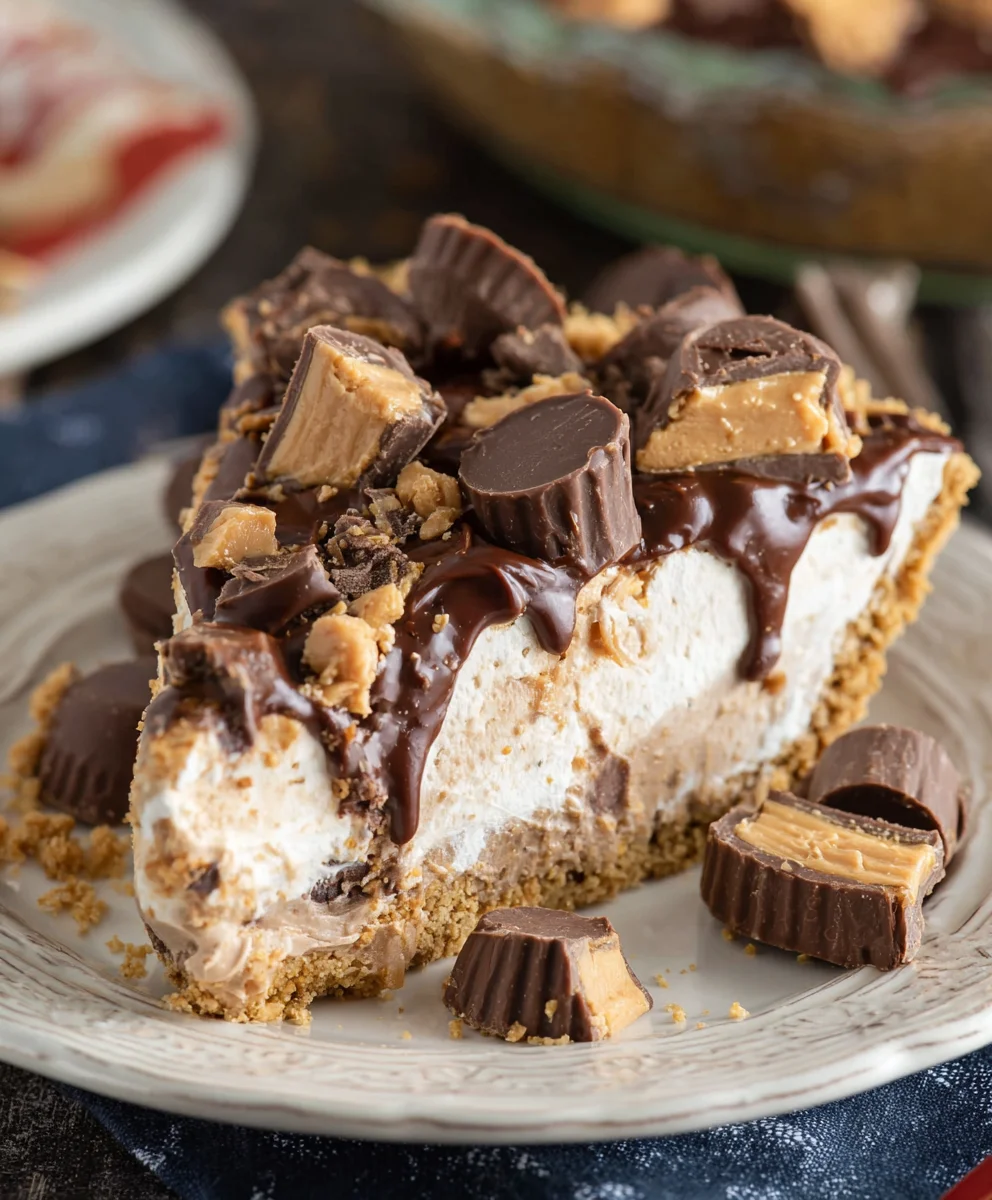
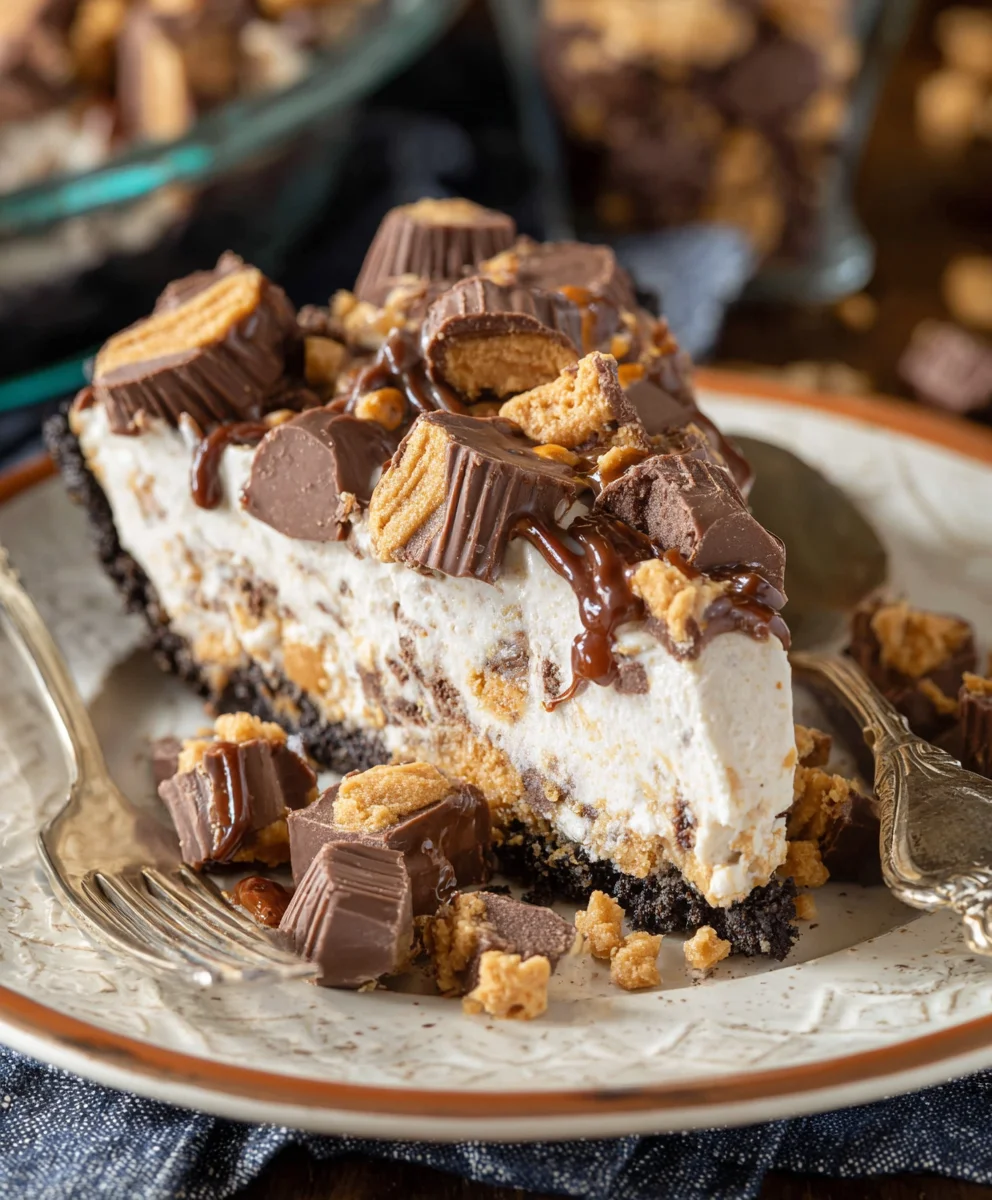
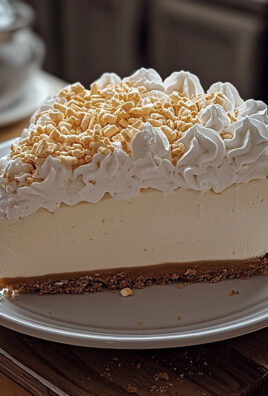
Once your pie is thoroughly chilled and perfectly set, it’s time for the grand finale! Just before serving, take your 6-8 regular-sized peanut butter cups that you roughly chopped earlier and artfully arrange them over the top of the pie. You can sprinkle them all over, create a decorative border, or arrange them in a central mound – let your creativity shine! If desired, finish with a generous drizzle of chocolate syrup for an extra touch of indulgence.
Serving Tip: For neat, clean slices, use a sharp knife that has been run under hot water and wiped dry before each cut. This will help you glide through the filling and crust without sticking. Store any leftover pie, tightly covered, in the refrigerator for up to 3-4 days. While it’s unlikely to last that long, it’s good to know it keeps well! Enjoy every glorious, peanut buttery bite of your homemade No Bake Peanut Butter Cup Pie!
Conclusion:
Well, my friends, we’ve reached the sweet end of our journey through this incredible recipe, and I truly hope you’re as excited as I am about the prospect of whipping up your very own dessert masterpiece. This isn’t just any treat; it’s a culinary hug, a delightful escape, and frankly, a showstopper that demands minimal effort for maximum impact. When I tell you that this No Bake Peanut Butter Cup Pie is a must-try, I’m not exaggerating – I’m sharing a secret weapon for anyone who loves the iconic combination of chocolate and peanut butter, all without the fuss of turning on an oven. Imagine a hot summer day, or a busy weeknight when you crave something decadent but lack the time for extensive baking; this pie steps in as your hero, delivering pure, unadulterated joy with every single forkful.
What makes it so indispensable, you ask? Firstly, its sheer simplicity. The “no bake” aspect is a game-changer, making it accessible to even the most novice of cooks or those simply short on time. You’ll spend mere minutes assembling layers of creamy, dreamy peanut butter filling, nestled in a crisp crust, all crowned with the irresistible crunch of your favorite peanut butter cups. The flavor profile is nothing short of extraordinary: the rich, salty-sweetness of peanut butter perfectly complements the deep cocoa notes of the chocolate, creating a symphony for your taste buds that is both comforting and exhilarating. It’s a nostalgic trip back to childhood while simultaneously feeling sophisticated enough for any adult gathering. Moreover, it consistently receives rave reviews, making you look like a seasoned pastry chef with surprisingly little effort. Trust me, the compliments will flow, and your friends and family will be begging for the recipe.
But the beauty of this pie doesn’t stop at its ease and incredible taste; it extends to its remarkable versatility. While simply chilled and served is absolutely divine, there are so many ways to personalize this creation. For a classic presentation, a generous dollop of freshly whipped cream on top, perhaps with a sprinkle of cocoa powder or a delicate drizzle of melted chocolate, elevates it instantly. Want to add more texture? Consider chopping some extra roasted peanuts and scattering them over the top for an added crunch. If you’re feeling adventurous, don’t hesitate to experiment with the crust – while a classic graham cracker crust is always a winner, an Oreo cookie crust can add an even deeper chocolate dimension, or a Nilla wafer crust could introduce a lovely vanilla note. For the filling itself, you could swirl in some Nutella for a hazelnut-chocolate twist, or even layer in sliced bananas for a delightful Elvis-inspired dessert. Think about turning these into individual mini pies using ramekins or muffin tins for portion control and elegant serving at your next brunch or dinner party. The possibilities are truly endless, allowing you to tailor this incredible recipe to suit any occasion or preference.
So, my fellow dessert enthusiasts, I implore you: don’t just read about this magic – go make it! Experience the sheer delight of creating something so utterly delicious with such minimal fuss. I promise you, one bite of this luscious pie, and you’ll understand why it has become a staple in my kitchen, and why I believe it will quickly become one in yours too. It’s perfect for potlucks, birthdays, holiday gatherings, or just a simple Tuesday evening when you need a little pick-me-up. Once you’ve made your magnificent No Bake Peanut Butter Cup Pie, please, please, please come back and tell me all about it! Share your photos, your serving suggestions, your variations, and your triumphs in the comments below or tag me on social media. I absolutely adore seeing your culinary creations and hearing about your experiences. Let’s spread the joy of easy, delicious desserts together!
Frequently Asked Questions About No Bake Peanut Butter Cup Pie:
How long does No Bake Peanut Butter Cup Pie last in the fridge?
When properly covered and stored in the refrigerator, your delicious pie will typically last for about 3 to 5 days. To keep it fresh and prevent it from absorbing other food odors, make sure to cover it tightly with plastic wrap or aluminum foil.
Can you freeze No Bake Peanut Butter Cup Pie?
Absolutely! This pie freezes beautifully. To freeze, wrap the entire pie (or individual slices) tightly in plastic wrap, then an additional layer of aluminum foil. It can be stored in the freezer for up to 1 to 2 months. Thaw it in the refrigerator overnight before serving for the best texture.
Can I use regular peanut butter instead of natural peanut butter?
Yes, you can! Most recipes for no-bake pies are quite forgiving. If using regular, processed peanut butter (like Jif or Skippy), you might find the filling a little sweeter and potentially a bit firmer due to the added sugars and oils. You may need to slightly adjust the amount of powdered sugar to taste, as regular peanut butter is often sweeter than natural varieties. Always taste and adjust as you go!
What kind of crust can I use for this pie?
While a classic graham cracker crust is often recommended and delightful, this pie is incredibly versatile! You can absolutely use an Oreo cookie crust for a richer chocolate flavor, a Nilla wafer crust for a vanilla-infused base, or even a crushed shortbread cookie crust. Any pre-made or homemade crumb crust works wonderfully with this recipe.
Why is my no-bake pie not setting?
This can happen occasionally, but there are usually simple explanations! The most common reasons are: 1) Not chilling long enough – no-bake pies need ample time (at least 4-6 hours, ideally overnight) in the fridge to set completely. 2) Too much liquid – ensure your ingredients, especially if adding anything extra, don’t thin out the filling too much. 3) Not enough stabilizer – cream cheese and powdered sugar are key. Make sure your cream cheese is softened to ensure smooth blending and that you’ve used the correct amount of powdered sugar. Patience is key with no-bake desserts!
Rich & Creamy No Bake Peanut Butter Cup Pie Dessert
Imagine sinking your fork into a silky-smooth, intensely flavored pie, where every bite is a luxurious blend of salty-sweet peanut butter and luscious chocolate, all without the need to ever turn on your oven. This No Bake Peanut Butter Cup Pie is an impressive yet simple showstopper for any occasion.
Ingredients
-
1 pre-made 9-inch pie crust (Nutter Butter, Oreo, or Graham Cracker flavor)
-
8 ounces (226g) cream cheese, softened to room temperature
-
1/4 cup (50g) granulated sugar
-
1/3 cup (89g) creamy peanut butter (no-stir, not natural)
-
1 teaspoon vanilla extract
-
1 (8-ounce) container whipped topping, thawed
-
2 cups peanut butter cups, chopped (divided)
-
Hot fudge ice cream topping (optional)
Instructions
-
Step 1
Place the pre-made 9-inch pie crust into a pie plate. Chill in the refrigerator for at least 30 minutes while preparing the filling. -
Step 2
In a large mixing bowl, beat the softened cream cheese with an electric mixer on medium speed for 2-3 minutes until incredibly smooth, light, and lump-free. Scrape down the sides of the bowl as needed. -
Step 3
Reduce mixer speed to low and gradually add the 1/4 cup granulated sugar. Increase speed to medium-high and beat for 2-3 minutes until light and fluffy. Add the 1/3 cup creamy peanut butter and 1 teaspoon vanilla extract. Beat on medium speed until the mixture is completely smooth and uniformly creamy, about 1-2 minutes. Do not overmix. -
Step 4
Gently fold 1 cup of the chopped peanut butter cups into the peanut butter filling using a rubber spatula. Ensure the pieces are evenly distributed. -
Step 5
Gently fold the entire 8-ounce container of thawed whipped topping into the peanut butter mixture using a rubber spatula. Use an upward motion from the bottom of the bowl, turning the bowl as you go, until the whipped topping is fully incorporated and no streaks of white remain. The filling should be light, airy, and homogeneous. -
Step 6
Retrieve the chilled crust from the refrigerator. Carefully spoon the entire peanut butter filling into the crust and gently spread it evenly across the surface. Place the assembled pie back into the refrigerator to chill for a minimum of 4-6 hours, or ideally overnight (8 hours or more), until perfectly firm and set. -
Step 7
Once thoroughly chilled and set, artfully arrange the remaining 1 cup of chopped peanut butter cups over the top of the pie. If desired, finish with a generous drizzle of hot fudge ice cream topping. For neat slices, use a sharp knife run under hot water and wiped dry before each cut. Store any leftover pie, tightly covered, in the refrigerator for up to 3-4 days.
Important Information
Nutrition Facts (Per Serving)
It is important to consider this information as approximate and not to use it as definitive health advice.
Allergy Information
Please check ingredients for potential allergens and consult a health professional if in doubt.
Leave a Comment