

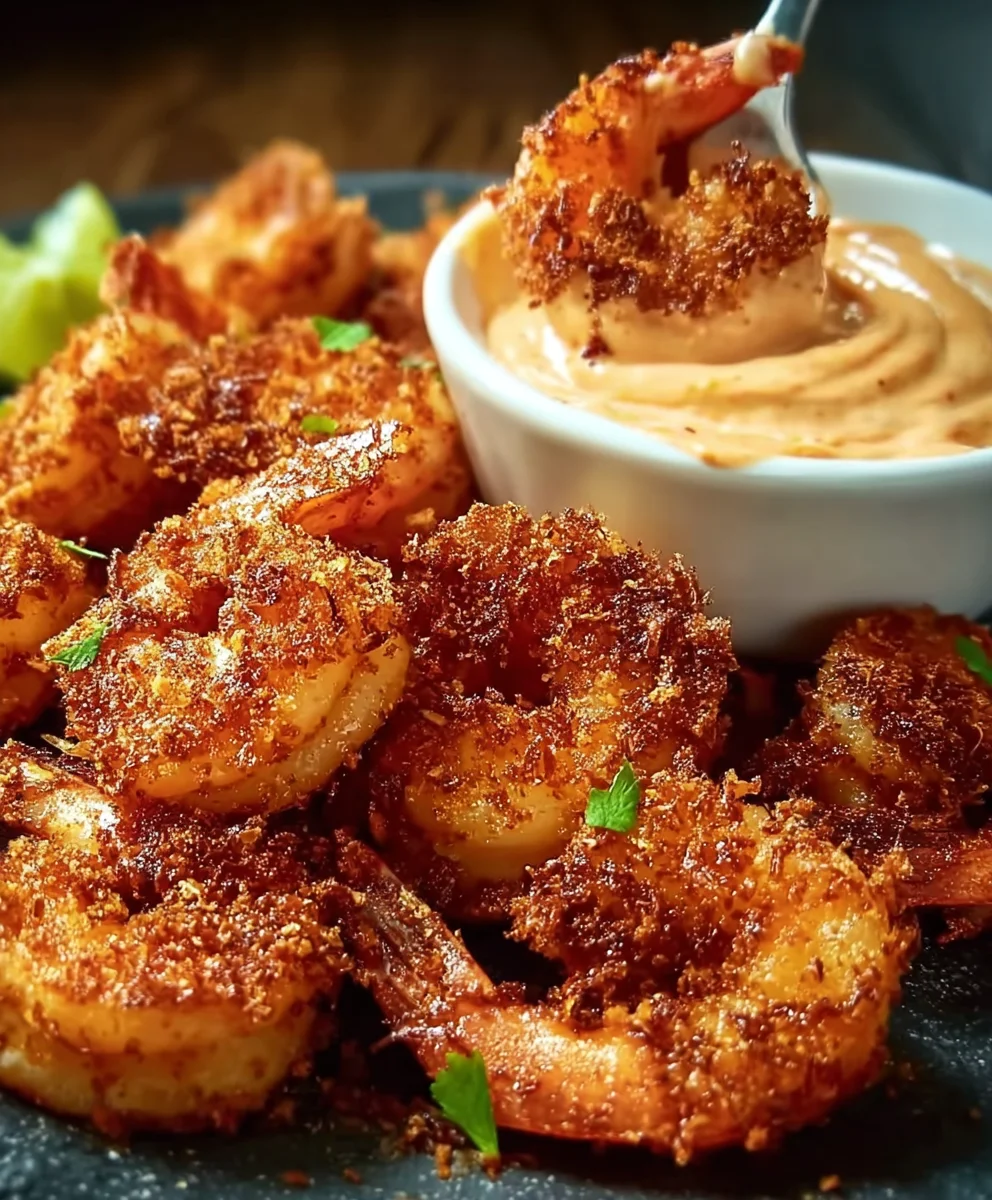
Coconut Shrimp With Sweet Chili Mayo An Amazing Ultimate Recipe is not merely a dish; it’s an unforgettable culinary experience that promises to transport your palate to a sun-drenched beach with every golden, crispy bite. I have always found immense joy in the harmonious blend of sweet, savory, and a hint of spice, and this particular creation truly encapsulates that magic. While coconut shrimp itself has gracefully emerged as a beloved appetizer on menus ranging from vibrant beachside shacks to elegant dining establishments, its enduring popularity stems from a brilliant fusion of tropical inspirations – the inherent sweetness of coconut paired with the delicate succulence of perfectly cooked shrimp. This combination offers a delightful contrast in textures: the satisfying crunch of the exterior giving way to the tender, juicy interior.
What truly elevates this dish, making it an ultimate favorite, is the vibrant Sweet Chili Mayo.
This creamy, tangy, and subtly spicy dipping sauce doesn’t just complement; it perfectly balances the richness of the fried shrimp, adding an irresistible zing that keeps you reaching for more. It’s this exquisite interplay of flavors and textures that makes our Coconut Shrimp With Sweet Chili Mayo An Amazing Ultimate Recipe a cherished appetizer, a delightful party snack, or even a light, satisfying meal. It’s a dish celebrated globally for its ability to brighten any occasion and impress even the most discerning palates. Prepare to fall in love with its irresistible charm!
Ingredients:
- For the Shrimp:
- 2 pounds large raw shrimp, peeled and deveined, tails on (my personal preference for presentation!)
- 1 teaspoon salt
- ½ teaspoon black pepper
- For the Breading Station:
- ½ cup all-purpose flour
- 1 teaspoon paprika (for a little color and subtle warmth)
- ½ teaspoon garlic powder
- ¼ teaspoon cayenne pepper (optional, for a hint of heat)
- 2 large eggs, whisked with 1 tablespoon water or milk
- 1 ½ cups panko breadcrumbs
- 1 ½ cups unsweetened shredded coconut (desiccated or flaked, depending on your desired texture – I love the flaked for extra crunch!)
- For Frying:
- 4-6 cups vegetable oil, canola oil, or peanut oil (a high smoke point oil is essential for proper frying)
- For the Sweet Chili Mayo (the perfect companion!):
- 1 cup good quality mayonnaise (I always opt for a full-fat, creamy brand)
- ½ cup sweet chili sauce (Thai-style is my go-to)
- 1 tablespoon fresh lime juice (this brightens everything up so beautifully)
- 1 teaspoon Sriracha (adjust to your heat preference, or omit for a milder sauce)
- ½ teaspoon grated fresh ginger (a secret ingredient that adds incredible depth!)
- Pinch of salt
- For Garnish:
- Fresh lime wedges
- Chopped fresh cilantro or parsley
Preparing the Sweet Chili Mayo: The Heart of This Amazing Ultimate Recipe
-
Combine Ingredients: In a medium bowl, whisk together the mayonnaise, sweet chili sauce, fresh lime juice, Sriracha (if using), grated fresh ginger, and a pinch of salt. I find that taking the time to grate fresh ginger rather than using powdered ginger makes a noticeable difference in the freshness and aromatic complexity of the sauce. The Sriracha is completely optional, but for me, that little kick elevates the entire flavor profile, balancing the sweetness of the chili sauce perfectly. It really brings out the “amazing” in this Coconut Shrimp With Sweet Chili Mayo An Amazing Ultimate Recipe.
-
Taste and Adjust: Give it a good taste! This is your moment to make it truly yours. Do you prefer it a little tangier? Add a touch more lime juice. Want more heat? Another dash of Sriracha. Is it just right? Perfect! Remember, this sauce is going to be the creamy, zesty counterpoint to the crispy, sweet shrimp, so you want its flavors to sing.
-
Chill for Flavor Development: Cover the bowl and refrigerate the sweet chili mayo for at least 30 minutes. Ideally, I like to make this an hour or two ahead, or even the day before. This allows all those wonderful flavors to meld and deepen, resulting in a much more cohesive and delicious sauce. Plus, it’s one less thing to worry about when you’re in the thick of frying shrimp!
Preparing the Shrimp: Setting the Stage for Perfection
-
Handle with Care: If your shrimp aren’t already peeled and deveined, this is the first crucial step. Gently remove the shells, leaving the tails on. I always advocate for leaving the tails on because it creates a convenient little handle for dipping and a more attractive presentation. Then, make a shallow incision along the back of each shrimp to expose the dark vein. Use a small knife or your fingers to carefully remove it. This vein, while harmless, can sometimes impart a gritty texture, and we want only the best for our dish!
-
Pat Them Dry, Seriously: This is a step many people overlook, but it’s absolutely vital for achieving crispy coconut shrimp. Lay the peeled and deveined shrimp on several layers of paper towels. Place more paper towels on top and gently press to remove as much moisture as possible. Repeat with fresh paper towels if needed. Why is this so important? Excess moisture on the shrimp will create steam during frying, which will prevent the breading from becoming truly crispy and can even make it fall off. Dry shrimp means a fantastic, crunchy coating that adheres beautifully.
-
Season Generously: Once thoroughly dry, transfer the shrimp to a clean bowl. Season them evenly with 1 teaspoon of salt and ½ teaspoon of black pepper. Toss gently to ensure every shrimp gets a little seasoning love. This foundational seasoning enhances the shrimp’s natural flavor before it’s even coated, making for a much more delicious bite. Don’t underestimate the power of seasoning at this stage!
Setting Up the Breading Station: The Triple-Threat Coating
Creating an organized breading station is key to a smooth and mess-free process. Trust me, a little preparation here saves a lot of hassle later!
-
Prepare the Flour Dredge: In the first shallow dish or pie plate, combine the ½ cup all-purpose flour, 1 teaspoon paprika, ½ teaspoon garlic powder, and ¼ teaspoon cayenne pepper (if using). Whisk these dry ingredients together thoroughly. The paprika not only adds a lovely subtle color but also a hint of smoky sweetness, and the garlic powder and cayenne provide an underlying savory warmth. This initial flour coating helps the egg adhere better.
-
Prepare the Egg Wash: In the second shallow dish, crack the 2 large eggs and whisk them vigorously with 1 tablespoon of water or milk until well combined and slightly foamy. The egg wash acts as the “glue” that binds the dry flour coating to the crispy panko and coconut mixture. A properly whisked egg wash ensures even coverage.
-
Prepare the Coconut-Panko Mix: In the third shallow dish (and I often use a slightly larger one for this), combine the 1 ½ cups panko breadcrumbs and 1 ½ cups unsweetened shredded coconut. Stir them together until they are evenly distributed. Panko breadcrumbs are fantastic because their flakes are larger and airier than traditional breadcrumbs, leading to an incredibly crisp texture. Combined with the coconut, it creates that signature crunch and tropical flavor that makes this dish so irresistible.
Breading the Shrimp: Crafting the Crispy Coating
-
The Assembly Line: Now for the fun part! Take one seasoned shrimp by its tail and dip it first into the flour mixture, ensuring it’s completely coated. Shake off any excess flour – we want a thin, even layer, not clumps.
-
Into the Egg Wash: Next, transfer the flour-coated shrimp into the egg wash. Let any excess egg drip off briefly. Again, an even, thin coating is what we’re aiming for. This ensures the coconut-panko mixture will stick without becoming soggy.
-
The Final Coconut Embrace: Finally, place the egg-washed shrimp into the coconut-panko mixture. Press down gently but firmly to ensure the coconut and panko adhere well to all surfaces of the shrimp. Don’t be shy here; really pack that coating on! This is where the magic happens, forming that glorious, golden crust. Place the fully coated shrimp on a clean baking sheet or plate lined with parchment paper, making sure they don’t touch each other.
-
Repeat and Chill: Continue this breading process with the remaining shrimp. I find it helpful to use one hand for the dry ingredients (flour, coconut-panko) and the other hand for the wet ingredient (egg wash) to keep things cleaner. Once all the shrimp are breaded, place the baking sheet in the refrigerator for at least 15-20 minutes. This chilling step is another critical tip! It allows the breading to “set” and adhere firmly to the shrimp, greatly reducing the chances of it falling off during frying. This small pause makes a huge difference in the final crispiness and integrity of your coconut shrimp.
Frying the Coconut Shrimp: The Moment of Truth
-
Heat the Oil: In a large, heavy-bottomed pot or Dutch oven (I prefer cast iron for its even heat distribution), pour in 4-6 cups of vegetable, canola, or peanut oil. You’ll want enough oil to submerge the shrimp completely or at least halfway. Attach a deep-fry thermometer to the side of the pot and heat the oil over medium-high heat until it reaches 350°F (175°C). Maintaining the correct oil temperature is paramount for perfect frying. If the oil isn’t hot enough, the shrimp will absorb too much oil and become greasy. If it’s too hot, the coating will burn before the shrimp cooks through. Don’t rush this step!
-
Prepare Your Landing Zone: While the oil is heating, line a separate large plate or baking sheet with several layers of paper towels. This will be where you place the fried shrimp to drain excess oil, keeping them deliciously crisp.
-
Fry in Batches: Once the oil is at the optimal temperature, carefully lower 4-5 breaded shrimp into the hot oil using tongs. Do not overcrowd the pot! Overcrowding will cause the oil temperature to drop significantly, leading to soggy, poorly cooked shrimp. It’s much better to work in smaller batches to ensure consistent, perfectly crispy results. You’ll hear that satisfying sizzle immediately – that’s what we want!
-
Cook to Golden Perfection: Fry the shrimp for about 2-3 minutes per side, or until they are a beautiful, deep golden-brown color and the coconut flakes are toasted to a delightful crisp. The shrimp itself will turn opaque and pink when cooked through. Keep an eye on the oil temperature and adjust the heat as needed to maintain that 350°F (175°C) sweet spot. You might need to turn the heat up slightly between batches or down if it gets too hot.
-
Drain and Repeat: Once fried to perfection, use tongs or a spider strainer to carefully remove the shrimp from the oil. Transfer them immediately to your paper towel-lined plate to drain any excess oil. While they’re draining, quickly sprinkle them with a tiny pinch of salt – this enhances their flavor further while they’re still hot. Repeat the frying process with the remaining shrimp, ensuring the oil returns to temperature before each new batch.
Serving Your Amazing Ultimate Recipe: The Grand Finale
-
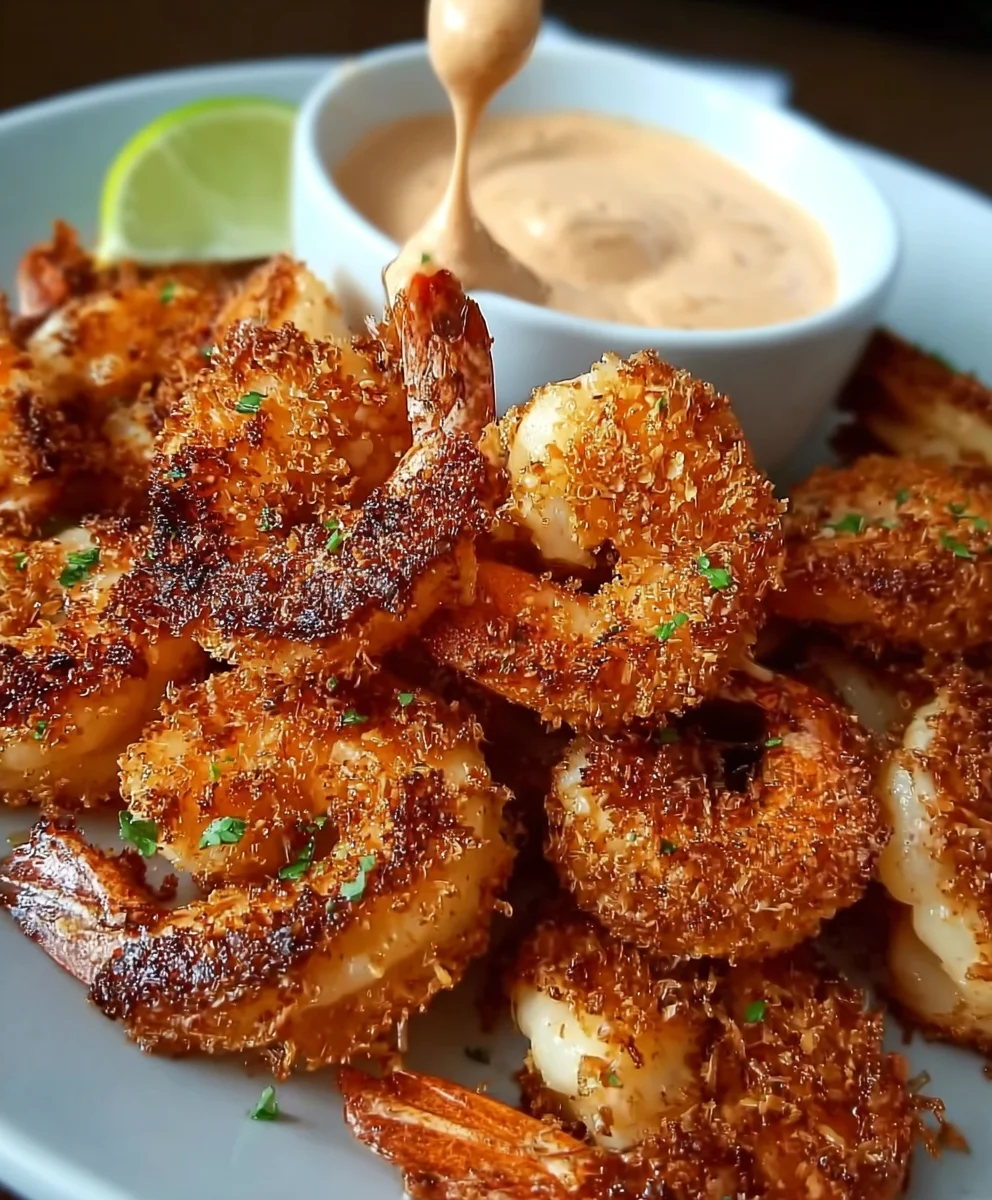
Immediate Gratification: Coconut shrimp are always best served hot and fresh, straight from the fryer. The crispiness is at its peak, and the flavors are vibrant. Arrange the freshly fried shrimp artfully on a serving platter.
-
Garnish with Freshness: Scatter some chopped fresh cilantro or parsley over the top for a pop of color and a fresh herbaceous note. Then, tuck fresh lime wedges around the platter. A squeeze of fresh lime juice over the warm shrimp right before eating adds a burst of acidity that cuts through the richness and truly brightens every bite.
-
The Perfect Pairing: Serve the warm, crispy coconut shrimp alongside that amazing, chilled sweet chili mayo you prepared earlier. Encourage everyone to dip generously! The marriage of the sweet, crunchy, savory shrimp with the creamy, spicy, and tangy mayo is what makes this truly “Coconut Shrimp With Sweet Chili Mayo An Amazing Ultimate Recipe.” It’s an explosion of textures and flavors that will undoubtedly impress everyone lucky enough to try it.
-
Enjoy and Share: Watch as these disappear quickly! This dish is perfect as an appetizer for a party, a delightful snack, or even as a light main course with a fresh salad. The combination of the sweet coconut, tender shrimp, and that irresistible dipping sauce creates a culinary experience that is both exotic and comforting. I promise, once you try this recipe, it will become a go-to favorite for special occasions and weeknight treats alike.
Conclusion:
So, there you have it, my friends! We’ve journeyed through the simple yet utterly delightful process of creating a dish that truly stands out. If you’re looking for that perfect blend of crispy, sweet, savory, and just a hint of heat, then believe me, you absolutely must try your hand at this recipe. I can confidently say that crafting your own homemade coconut shrimp elevates the experience far beyond anything you’d find in a frozen aisle or even many restaurants. The aroma alone, as those golden-brown beauties emerge from the hot oil, is enough to get anyone’s taste buds tingling with anticipation. This isn’t just a recipe; it’s an invitation to create a memorable culinary moment, one that promises to impress whether it’s a casual weeknight dinner or a sophisticated get-together.
What makes this recipe a true game-changer? It’s the impeccable contrast. The succulent, tender shrimp encased in that perfectly crisp, golden-brown crust of shredded coconut and panko, delivering an explosion of texture with every bite. Then, there’s the star dipping companion: that vibrant, creamy sweet chili mayo. It’s not just a sauce; it’s the perfect counterbalance, cutting through the richness with its tangy, subtly spicy, and wonderfully sweet notes. It transforms each mouthful into a harmonious symphony of flavors that will leave you reaching for just one more, and then one more after that. I’ve seen firsthand how quickly a platter of these disappears at any gathering, making it a reliable crowd-pleaser every single time. It truly is a testament to the fact that sometimes, the simplest ingredients, when combined with a little love and the right technique, can yield the most extraordinary results.
Now, let’s talk about making this dish truly your own. While it shines brightly as a standalone appetizer, don’t hesitate to elevate it to main course status. I love serving my Coconut Shrimp With Sweet Chili Mayo An Amazing Ultimate Recipe alongside a fragrant bed of jasmine rice, perhaps with a squeeze of fresh lime over everything to brighten the flavors even further. For a more complete meal, consider adding a fresh, vibrant side salad – something with a light vinaigrette would be ideal – or a simple, crisp coleslaw to complement the richness. If you’re feeling adventurous, a tropical mango salsa with red onion and cilantro makes for an absolutely divine pairing, adding another layer of fruity sweetness and a burst of color. And for those who love variety, consider offering a couple of dipping sauce options beyond the sweet chili mayo. A zesty lime aioli, a classic cocktail sauce, or even a spicy sriracha-lime dipping sauce can cater to different preferences, turning your table into a customizable feast. Don’t be afraid to experiment with the type of coconut you use either – fine shredded coconut will give a different texture than flaked, and both are delicious in their own right!
My ultimate encouragement to you is this: carve out some time this week, gather your ingredients, and give this incredible recipe a try. You won’t regret it, I promise. There’s a special kind of satisfaction that comes from creating something so utterly delicious from scratch, something that brings smiles to the faces of everyone who tastes it. Once you’ve made your batch, I would absolutely love to hear about your experience! Did you stick to the recipe exactly? Did you add your own unique twist? Perhaps a sprinkle of cayenne in the breading, or a dash of ginger in the mayo? Share your triumphs, your photos, and any brilliant variations you came up with in the comments below or tag me on social media. Let’s build a community around delicious food and share the joy of cooking! Happy frying (or baking, or air-frying – we’re all about options here!).
FAQs (People Also Ask):
What kind of shrimp is best for coconut shrimp?
For the best results, I always recommend using large or jumbo raw shrimp, peeled and deveined, with the tails left on. The tail acts as a convenient little handle for dipping! Fresh is always preferable, but high-quality frozen shrimp, properly thawed, works beautifully as well. Aim for shrimp that are firm and plump.
Can I bake or air fry coconut shrimp instead of deep frying?
Absolutely! While deep frying gives that ultimate crispy texture, baking or air frying are fantastic healthier alternatives. To bake, preheat your oven to 400°F (200°C), lightly grease a baking sheet, and bake for 12-15 minutes, flipping halfway, until golden and cooked through. For air frying, preheat to 375°F (190°C), spray the shrimp lightly with oil, and air fry for 8-12 minutes, shaking the basket halfway, until crispy and golden. You might not get quite the same deep-fried crunch, but it’s still incredibly delicious!
How do you make the sweet chili mayo?
My sweet chili mayo is incredibly simple yet packed with flavor! You’ll just need a good quality mayonnaise as your base, then stir in sweet chili sauce (the kind you find in the Asian aisle), a squeeze of fresh lime juice for brightness, and a tiny pinch of salt to balance. Sometimes, I add a dash of sriracha for an extra kick, or a tiny bit of grated garlic for depth. Adjust the ratios to your personal taste – more sweet chili for sweetness, more lime for tang!
Can I make coconut shrimp ahead of time?
You can definitely do some prep work in advance! You can bread the shrimp a few hours before cooking and keep them covered in the refrigerator. However, I highly recommend frying (or baking/air frying) them just before serving to ensure maximum crispness and freshness. If you have leftovers, you can gently reheat them in an oven or air fryer to crisp them up again, but they won’t be quite as perfect as fresh.
What do you serve with coconut shrimp?
Beyond the amazing sweet chili mayo, coconut shrimp pairs beautifully with a variety of sides! Think tropical flavors: a fresh mango salsa, pineapple chunks, or a light green salad with a citrus vinaigrette. For something more substantial, jasmine rice, sticky rice, or even a simple coconut rice are wonderful accompaniments. A crisp coleslaw or some steamed Asian greens would also make excellent additions to your meal.
How do I get my coconut shrimp extra crispy?
The key to super crispy coconut shrimp lies in a few steps! First, ensure your shrimp are patted very dry before breading. Second, use a double breading technique: flour, egg wash, then a mix of panko breadcrumbs and shredded coconut. The panko is crucial for that extra crunch. Third, make sure your oil is at the correct temperature (around 350-375°F or 175-190°C) when frying, and don’t overcrowd the pan. Fry in batches to maintain oil temperature. If baking or air frying, a light spray of oil before cooking helps immensely.
Is coconut shrimp gluten-free?
Traditionally, coconut shrimp is not gluten-free due to the flour and panko breadcrumbs used in the coating. However, it’s very easy to make a delicious gluten-free version! Simply substitute regular all-purpose flour with a gluten-free all-purpose flour blend (ensure it’s certified GF), and replace panko breadcrumbs with gluten-free panko breadcrumbs (they are widely available now!). The shredded coconut itself is naturally gluten-free.
Ultimate Coconut Shrimp with Sweet Chili Mayo Recipe
An unforgettable culinary experience, this recipe brings together the inherent sweetness of coconut with delicate, perfectly cooked shrimp. The satisfying crunch of the exterior gives way to a tender, juicy interior, beautifully complemented by a vibrant, creamy, tangy, and subtly spicy Sweet Chili Mayo. Perfect as an appetizer, party snack, or light meal.
Ingredients
-
2 lb large raw shrimp, peeled, deveined, tails on
-
1 tsp salt
-
½ tsp black pepper
-
½ cup all-purpose flour
-
1 tsp paprika
-
½ tsp garlic powder
-
¼ tsp cayenne pepper (optional)
-
2 large eggs, whisked with 1 tbsp water or milk
-
1 ½ cups panko breadcrumbs
-
1 ½ cups unsweetened shredded coconut
-
4-6 cups vegetable, canola, or peanut oil (for frying)
-
1 cup mayonnaise
-
½ cup sweet chili sauce
-
1 tbsp fresh lime juice
-
1 tsp Sriracha (adjust to preference)
-
½ tsp grated fresh ginger
-
Pinch of salt (for mayo)
-
Fresh lime wedges (for garnish)
-
Chopped fresh cilantro or parsley (for garnish)
Instructions
-
Step 1
In a medium bowl, whisk together mayonnaise, sweet chili sauce, fresh lime juice, Sriracha (if using), grated fresh ginger, and a pinch of salt. Taste and adjust seasonings. Cover and refrigerate for at least 30 minutes (ideally 1-2 hours) to allow flavors to meld. -
Step 2
Peel and devein shrimp, leaving tails on. Pat shrimp thoroughly dry with paper towels to remove excess moisture. Season shrimp evenly with 1 tsp salt and ½ tsp black pepper. -
Step 3
Prepare three shallow dishes: one for the flour mixture (flour, paprika, garlic powder, cayenne), one for the egg wash (eggs whisked with water/milk), and one for the panko-coconut mixture. -
Step 4
Take one seasoned shrimp by its tail. First, dip into the flour mixture, shaking off excess. Next, dip into the egg wash, allowing excess to drip off. Finally, place into the coconut-panko mixture, pressing gently but firmly to ensure a full, even coating. Place breaded shrimp on a parchment-lined baking sheet without touching. Repeat with all shrimp. -
Step 5
Refrigerate the breaded shrimp for at least 15-20 minutes. This helps the breading adhere firmly during frying, preventing it from falling off and ensuring crispiness. -
Step 6
In a large, heavy-bottomed pot, pour 4-6 cups of high smoke point oil (vegetable, canola, or peanut) to submerge shrimp. Attach a deep-fry thermometer and heat oil to 350°F (175°C) over medium-high heat. Line a separate plate with paper towels for draining. -
Step 7
Carefully lower 4-5 breaded shrimp into the hot oil using tongs. Do not overcrowd the pot, as this will drop the oil temperature and lead to soggy shrimp. -
Step 8
Fry shrimp for 2-3 minutes per side, or until deep golden-brown and the coconut flakes are toasted. Shrimp will be opaque and pink when cooked through. Maintain oil temperature at 350°F (175°C). -
Step 9
Use tongs or a spider strainer to remove fried shrimp and transfer immediately to the paper towel-lined plate to drain excess oil. While hot, sprinkle with a tiny pinch of salt. Repeat frying process with remaining shrimp, ensuring oil returns to temperature before each new batch. -
Step 10
Arrange hot, freshly fried shrimp on a serving platter. Garnish with chopped fresh cilantro or parsley and fresh lime wedges. Serve immediately with the chilled Sweet Chili Mayo for dipping. Enjoy this delicious appetizer!
Important Information
Nutrition Facts (Per Serving)
It is important to consider this information as approximate and not to use it as definitive health advice.
Allergy Information
Please check ingredients for potential allergens and consult a health professional if in doubt.
Leave a Comment